- No products in the cart.

Two crafters make an equally good keyring. One sells steadily online, the other barely sells at all. Nine times out of ten the difference is not the product, the price or the description. It is the photograph.
Product photography is the single highest-leverage skill an online seller can learn, because online the photo is the product. Nobody can pick your work up. The image is doing all the work the object would do in person.
The good news: you do not need a camera, a studio or a lightbox. A phone, a window and a few habits will get you most of the way.
What’s in this guide
- 1. Use window light, never your flash
- 2. Fix the background first
- 3. Shoot the angles buyers need
- 4. Show scale
- 5. Style without cluttering
- 6. Use your phone properly
- 7. Edit lightly and consistently
- 8. Build a repeatable setup
- 9. Photographing personalised work
- 10. Export the right file size
- What kit is actually worth buying
- Working around South African light
- Should you shoot video too?
- Product photography FAQ
1. Use window light, never your flash
This is ninety percent of it. A phone flash produces harsh shadows, blown-out highlights and colour that does not match the actual product. Overhead room lights add a yellow or green cast that makes everything look cheap.
Instead: put your product on a surface near a window, on an overcast day or in the shade. Soft, indirect daylight is the most flattering light available, and it is free.
The specifics
- Side light, not front light. Position the product beside the window rather than facing it. Side light creates the gentle shadow that shows texture and shape.
- Avoid direct sun. South African midday sun is brutally hard. An overcast day is genuinely better, and a north-facing window is better still.
- Bounce light back. A sheet of white paper or card on the shadow side fills it in. This one trick makes phone photos look considered rather than snapped.
- Turn the room lights off. Mixing daylight and bulb light produces colour casts no editing will fully fix.
If you change one thing
Move to a window, turn off the flash and the room lights, and put a piece of white paper opposite the window. That single change improves most crafters’ product photography more than any equipment purchase.

2. Fix the background first
A cluttered background is the fastest way to make good work look amateur. The eye goes to the mess, not the product.
What works, in order of cost:
- A sheet of white A2 card. Costs almost nothing, works for small items, and curving it up against a wall removes the horizon line entirely.
- A plain wooden board or table. Adds warmth and texture without competing.
- Neutral fabric. Linen or plain cotton, ironed. Creases read as carelessness.
- A plain painted wall. Free, and consistent every time.
What does not work: your kitchen counter with the kettle in shot, a patterned tablecloth, a duvet, or anything where the background is more interesting than the product.
Should the background be white?
For marketplaces and your own shop, plain white or very light neutral is the safest default because it keeps attention on the product and looks consistent in a grid. For social media, a textured or coloured background often performs better because it stops the scroll. Many makers shoot both.
3. Shoot the angles buyers need
One photo is never enough. Online buyers cannot handle the object, so each additional angle removes a reason to hesitate.
A workable set for any handmade item:
- The hero shot. Straight on, well lit, the whole product, plain background. This is your listing thumbnail.
- A detail shot. Close enough to show texture, stitching, print quality or finish. This is where handmade work justifies its price.
- A scale shot. The product held in a hand or beside a familiar object.
- An in-use shot. The keyring on keys, the tumbler on a desk, the shirt on a person.
- The back or reverse. Especially for anything double-sided or personalised.
Shoot slightly above eye level for flat items and straight on for upright ones. Directly overhead works well for flat-lays and badly for anything with height.
4. Show scale, always
The most common complaint in handmade e-commerce is “it was smaller than I expected”. That is a photography failure, not a customer failure, and it drives returns and poor reviews.
Fixes, in order of effectiveness: a hand holding the item, the item in the place it is used, or the item next to something universally familiar. Stating dimensions in the description helps, but most people do not translate centimetres into a mental picture: a photo does that instantly.
5. Style without cluttering
Props should support the product, not compete with it. The test: remove each prop mentally and ask whether the photo got worse. If it did not, take it out.
Props that generally help are ones that establish context or scale: a notebook beside a pen, a coffee cup beside a desk item, the packaging the product ships in. Props that generally hurt are dried flowers scattered at random, fairy lights, and anything more colourful than the product.
Leave space around the item. Crowding the frame makes work look cheap; negative space makes it look considered. This is the same instinct that makes a well-spaced market stall outsell a crowded one.
6. Use your phone properly
Modern phones are more than adequate for product photography. Most people simply do not use the controls they already have.
- Tap to focus, then drag to set exposure. Almost every phone lets you tap the subject and then slide up or down to brighten or darken. Slightly darker is safer than slightly blown out, because you cannot recover white.
- Clean the lens. Genuinely. A pocket-smeared lens is the single most common cause of soft, hazy photos.
- Do not use digital zoom. It crops and degrades. Move closer instead.
- Use the main lens. Ultra-wide lenses distort shapes and are lower quality on most phones.
- Steady the phone. Brace against something, or use a cheap tripod. Sharpness reads as quality.
- Turn on the grid. It keeps horizons level, and a tilted flat-lay looks careless.
7. Edit lightly and consistently
Editing should correct, not transform. A photo that looks nothing like the product creates returns and complaints.
The adjustments that matter, in order:
- Exposure. Brighten until it looks like the object does in real life.
- White balance. Neutralise colour casts. Your white background should be white, not blue or yellow.
- Crop straight. Level and centred.
- Light sharpening. A small amount only.
What to avoid: heavy filters, aggressive saturation, and anything that changes the actual colour of the product. If a customer receives a duller item than the photo showed, that is a refund and a bad review.
Consistency matters more than perfection
A shop where every photo shares the same background, light and crop looks professional even if no single image is remarkable. A shop with ten beautiful but wildly different photos looks chaotic. Pick a look and repeat it.
8. Build a repeatable setup
The reason most crafters photograph inconsistently is that every shoot starts from scratch. Removing that friction is what turns product photography from a dreaded chore into a ten-minute job.
Decide once: which window, which surface, which background, phone at what height, product in which position. Then mark it. A piece of tape on the table showing where the board goes and where you stand is not excessive: it is what makes photo three hundred look like photo one.
Batch your shooting
Setting up and packing away is the expensive part. Photograph ten items in one session rather than one item ten times. The same logic that makes batching heat presses efficient applies here.
Photograph everything before it ships
This matters enormously for personalised work. Once a custom order leaves, that exact item no longer exists and never will again. Makers who photograph every finished piece build a library of real examples within months; those who do not are still using the same three photos two years later.
9. Photographing personalised work
Custom and personalised items present a specific problem: you are selling a thing that does not exist yet. The buyer needs to understand the possibility, not the specific item.
What works:
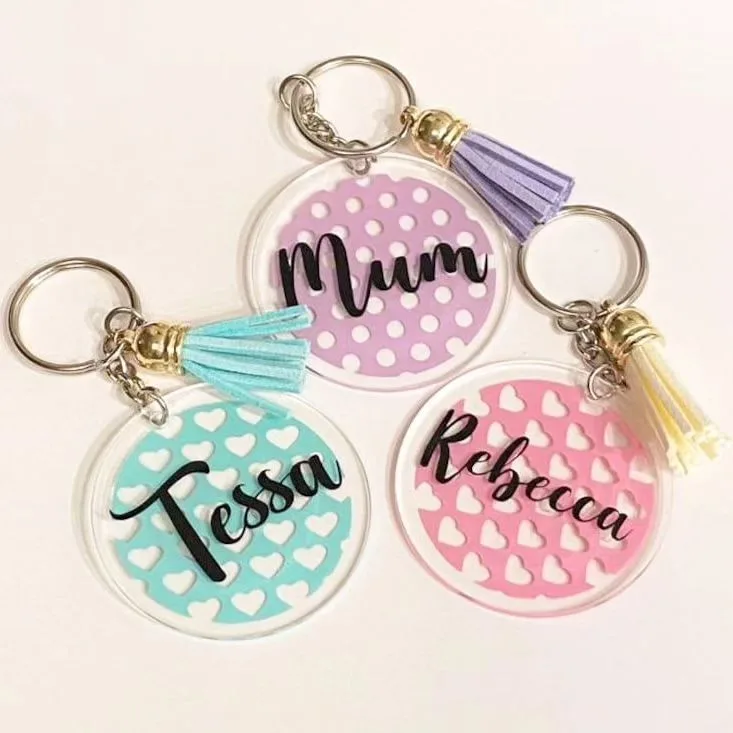
- Show several variations. The same product with three different names or photos communicates “this can be yours” better than one perfect example.
- Photograph the print area clearly. Buyers need to judge how much space their photo or text will actually get.
- Use a placeholder that is obviously a placeholder. A generic name reads as an example. A real customer photo can confuse people into thinking that is what they receive.
- Show the process if you can. A shot of the item being made carries real weight, because it proves the work is genuinely handmade.
Customer photos are gold here, with permission. A real person using the thing they ordered outperforms any studio shot for credibility.
10. Export the right file size
Enormous image files are the most common cause of slow handmade shops, and slow shops lose sales before anyone sees the product.
| Use | Sensible size | Notes |
|---|---|---|
| Product listing | 1200–2000px on the long edge | Enough for zoom without being wasteful |
| Blog or content image | 1200px wide | Rarely displayed larger than this |
| Social post | 1080px square or 1080×1350 | Platforms recompress anyway |
| File weight | Under about 200KB each | WebP achieves this comfortably |
Straight-from-phone photos are frequently 4–8MB. Uploading those unresized is how a shop ends up taking eight seconds to load on mobile data.
Six mistakes that quietly cost sales
1. One photo per listing
Every angle you leave out is a question the buyer answers by leaving. Five photos is a reasonable minimum.
2. Flash
Already covered, and still the most common error in handmade product photography.
3. Photos that misrepresent colour
Over-saturated editing produces returns. The photo should look like the object.
4. No scale reference
Leads directly to “smaller than expected” complaints and poor reviews.
5. Inconsistent style across a shop
Makes an otherwise good range look like a collection of unrelated things.
6. Forgetting alt text
A short factual description of each image helps blind and low-vision shoppers, and it is also how image search understands your products — Google’s own image guidelines are explicit about this. Skipping it forfeits both.
Product photography FAQ
Do I need a proper camera for product photography?
No. A phone from the last five years, used near a window with the flash off, produces entirely saleable images. Light and background matter far more than the camera.
Is a lightbox worth buying?
For small items photographed in volume, a cheap lightbox adds consistency and removes weather dependence. It is not necessary to start, and a window plus white card gets very close for free.
What background is best for handmade products?
Plain white or a light neutral for shop listings, because it keeps focus on the product and looks consistent in a grid. Textured or coloured backgrounds often perform better on social media.
How many photos should a product listing have?
Five as a minimum: hero, detail, scale, in use, and reverse. More is generally better, provided each one shows something new rather than repeating the same angle.
How do I photograph shiny or reflective items?
Diffuse the light and watch your own reflection. Shooting slightly off-axis, using a larger soft light source such as a curtained window, and holding a white card to fill shadows all reduce hotspots on metal and acrylic.
What size should product images be?
Around 1200 to 2000 pixels on the longest edge, compressed to under roughly 200KB. Straight-from-phone files are far larger than needed and slow the page down.
What product photography kit is actually worth buying
Almost everything sold as essential product photography equipment is optional. Here is the honest order of return on spend.
| Item | Worth it? | Why |
|---|---|---|
| White A2 card | Buy immediately | Costs almost nothing and fixes backgrounds and fill light |
| Cheap phone tripod | Buy early | Sharpness and repeatable framing in one purchase |
| Plain wooden board | Worth it | Adds warmth; doubles as a market display surface |
| Lightbox | Only if high volume | Removes weather dependence for small items |
| Continuous LED light | Only if you shoot at night | Solves the winter-evening problem |
| A dedicated camera | Rarely | Modern phones are sufficient for web-sized product photography |
The pattern is consistent: money spent on controlling light beats money spent on the camera. A phone in good light comfortably outperforms an expensive camera in bad light.
Working around South African light
Local conditions affect product photography more than most guides acknowledge.
Summer midday sun is far too harsh for direct use. Shoot in the shade, or early and late in the day. A bright overcast sky is the best natural light most crafters will ever get.
Winter brings the opposite problem: usable daylight disappears by late afternoon, which is difficult if you make in the evenings. This is the situation where a continuous LED light genuinely earns its cost.
Load shedding is worth planning around if it still affects your area. Daylight product photography needs no power at all, which is a real advantage over an artificial-light setup that dies mid-session.
Find your window and note the time
Every home has one window that produces good light for a couple of hours a day. Find yours, note when, and schedule shooting for that slot. Knowing that your product photography happens between ten and midday at the lounge window removes almost all the friction from doing it regularly.
Should you shoot video too?
Short video now outperforms static images on most social platforms, and a surprising amount of it needs no more skill than good product photography already requires.
The formats worth doing, in order of effort:
- A slow turn. Ten seconds rotating the product on a plain surface. Shows dimension and finish in a way a photo cannot.
- An unboxing. The item coming out of its packaging, filmed once, reusable forever.
- The making. A short clip of the press closing, the paint going on, the stitch being sewn. This is the highest-performing content most crafters can produce, because it proves the work is genuinely handmade.
Shoot vertical for social, keep clips under thirty seconds, and use the same window light you use for stills. No narration needed: the process is the story.
One caution: video files are large. Host video on a platform like YouTube and embed it rather than uploading it to your own site, or you will undo the page-speed work your compressed images achieved.
Reshoot your bestsellers first
If your existing photos are weak, do not try to redo everything at once. Identify the three or four products that already sell best and reshoot only those. Improving the photography on items that already convert produces a measurable lift quickly, and it gives you a reference set to match everything else to later.
Products that have never sold are a different problem. Better photographs may help, but so may a different price or a different product entirely, and it is worth working out which before spending a morning on the lighting.
Where to go next
Good photographs only pay off if the price underneath them is right: our guide to pricing handmade products covers that side. If you sell in person as well, craft markets are where your photo library gets built fastest.
And if you are photographing personalised items you produce yourself, the sublimation printing guide covers getting the print quality worth photographing.
Make it personal
Every item in our range can be customised with your own photo, name or message, printed and finished in-house and delivered anywhere in South Africa.